Designer - Adding and editing entities
Preface
As mentioned in
Concepts - Entities, lists and views, an Entity maps
onto a table or view definition and has the ability to inherit mapping information from a supertype, and is one of the building blocks
of the code you're designing using LLBLGen Pro.
Before you add any entities, make sure the project properties have the right strip patterns defined for entity names and field names. Those strip patterns
are used to strip off prefixes you do not want in your entity names and field names. For example, say each table is prefixed with "Tbl_". When you set the
strip pattern for entity names to "Tbl_", and you retrieve the entity names from the catalog schemas, LLBLGen Pro will automatically
strip off the "Tbl_" prefix of all table names, and use the rest of the name for the entity name (Spaces are stripped too, first character
is always capitalized).
Adding entities
To add entities to your project you take the following steps:
- In the Project Explorer, right-click 'Entities' and choose 'Add New Entities Mapped On Tables From Catalog(s)'. You can also select 'Entities' and
press Ctrl + T, or select 'Add New Entities Mapped On Tables From Catalog(s)' in the Project menu of the designer. This will allow you to add
entities based on a table. If you want to add entities based on views, select 'Add New Entities Mapped On Views From Catalog(s)' instead (or press
Ctrl + V)
- A screen will pop up, showing all database tables (or views) in the catalog. As you can map as many entities onto a single target as you'd like,
all tables (or views) are always listed. LLBLGen Pro automatically suggests names for entities for these targets, so if you already have an entity
mapped on a given table/view, it will make sure the name suggested isn't clashing with the names already available in the project.
By default, no possible entity is checked to be added to the project.
You can check / uncheck entities by either using your mouse, or by stepping through them using your keyboard arrows. The spacebar
will toggle the checkbox belonging to the selected entity on and off. You can also select one ore more rows in the grid and click
'Toggle checkboxes of selected rows', which will toggle the checkboxes of the rows you selected. Each row that is checked
will be added to the project as an entity. Keep in mind that all names in an LLBLGen Pro project have their first character capitalized,
need to be CLSCompliant and should be usable as a C# identifier. This way each name can be used in the code safely.
To change a pre-selected name, just select the cell in the grid and change the value.
- When you're done checking entity checkboxes, click 'Add to project'.
 Note: Note:
|
|
it's not recommended to map an entity onto a view which returns duplicate rows.
|
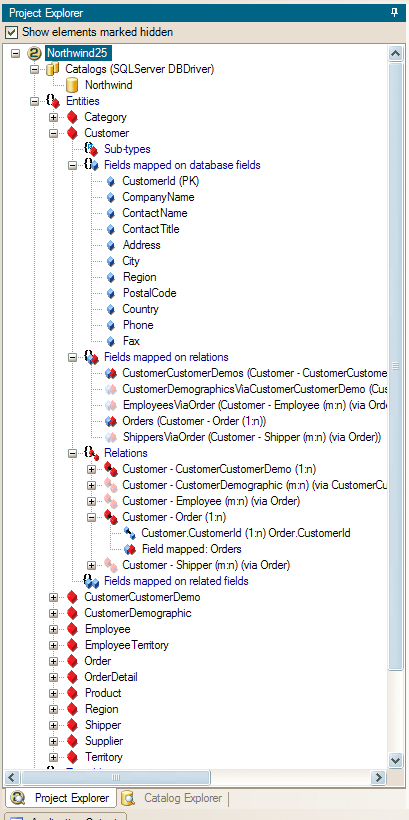
All entities you've checked in the entity selection screen will be added to the project and will be visualized in the Project Explorer.
If you click open the 'Entities' node, you'll see these new entities added, their fields mapped on table fields, relations the entity
has with other entities, and fields mapped on these relations. As each entity is new, you'll see that all the entities have the front and back color
you've set for changed items in the
user preferences.
Each relation can be expanded to see the further details of the relation:
which entity fields form the relation and, if the relation is a m:n relation (many to many), the entity which binds the m:n related entities
together.
As you will notice, LLBLGen Pro can determine every relation there is between entities if the proper foreign key constraints are in place
in the catalog schemas, and if your tables participating in those foreign keys have properly defined primary keys.
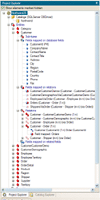
Please click on the thumbnail image at the right to view the project explorer window after the Northwind entities have been added to the project and
the project has been saved. A project without changes has a yellow icon with a blue '2' , a project with unsaved changes has a yellow icon with a red '2'.
Editing an entity
To edit an entity, you either double click it in the project explorer (if you've set the
user preference
ProjectExplorerOpenElementOnDoubleClick to true) or you click with the right mouse button on an entity, and select 'Edit / Properties' or
press Ctrl + E. An entity editor opens in the
tabbed area, showing the complete entity and
all editable elements on six possible sub tabs:
Inheritance Info, Fields on database fields, Fields on relations, Relations, Fields on related fields and Custom properties.
The sub tabs can be navigated at the bottom
of the Entity editor tab. Besides these sub tabs, the editor allows you to alter the name of the entity and view the target table in the catalog explorer.
Inheritance info sub tab
The first sub tab is Inheritance info. This is the sub tab which contains a full hierarchy view of the entity in the inheritance hierarchy it is in, as well as
additional info about the entity being abstract, the discriminator value (if applicable), and the hierarchy type the entity is in. If the entity is not in an
inheritance hierarchy, this tab isn't visible.
A screenshot of this sub tab of the Employee entity and its hierarchy is shown below.
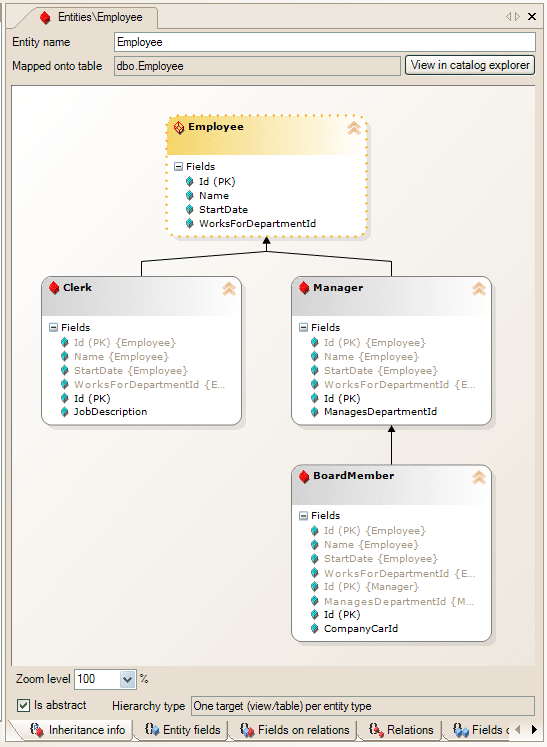
Inheritance info sub tab of the entity editor
The entity edited in the particular entity editor has a
yellow horizontal band, as shown in the screenshot with the Employee entity. Other entities in the
hierarchy have a
grey band. If an entity is
abstract, its border is dotted, as shown with the Employee entity. You can select multiple entities
in the viewer, drag them around, open the fields listing for them and make the viewer reset the layout by pressing Cntrl-L.
The graph viewer has a context menu as well, which you can activate by right-clicking on the background of the viewer. You can also activate some entity-related
actions by right-clicking an entity in the graph and selecting an option from the context menu.
At the bottom, below the graph viewer, you'll be able to set the zoom level. This can be handy when the hierarchy is large and doesn't fit on the screen. A checkbox
lets you set the entity's Abstract state. You can only set an entity's abstract state (i.e. making the entity abstract) if the entity has a subtype, and it doesn't have
a non-abstract supertype.
If the entity is in a hierarchy of type TargetPerEntityHierarchy, you'll see per entity in the graph their discriminator value, and you can set the discriminator value
for the entity being edited in a textbox at the bottom of the Inheritance info sub tab. The value is validated as you leave the textbox, so improper values aren't
possible. For more information about inheritance mapping, see
Designer - Inheritance mapping.
Fields mapped on database fields sub tab
The second sub tab (or if the entity isn't in an inheritance hierarchy, the first tab) is Fields mapped on database fields. This is the sub tab which
contains all entity fields and information about the database fields, their types, sizes etc. An entity's fields are shown in three possible tabs:
Mapped entity fields, Unmapped entity fields, and if the entity is in a hierarchy, Inherited entity fields. Per tab, a screenshot is given and
the controls are explained.
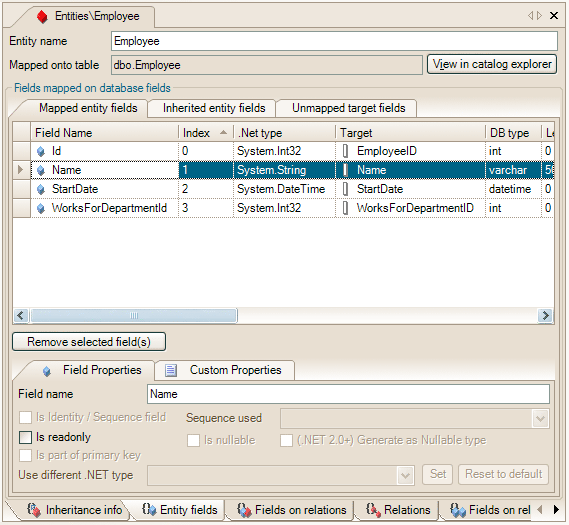
Fields mapped on database fields sub tab of the entity editor: Mapped entity fields
When you select a field in the list, you can change its name. This name, as with all names, can't contain spaces and will have its first character
upper cased. Also, all field names have to be unique within an entity (including fields mapped on relations and fields mapped on related fields).
On databases which support identity columns and/or sequences, you can select which fields are sequenced fields and you can select the sequence to
use to feed values to a field's database column. Sometimes more than one sequence is available. If the database provided a sequence automatically
(for example if it's an identity column), the particular sequence is preselected. Be aware that making a field
not an identity field, by unchecking
the Is Identity / Sequenced field checkbox while the field is an identity field could make your code fail at runtime due to insert problems.
|
Note:
|
|
If an entity is in a hierarchy of type TargetPerEntity, a fields defined in the subtype which has the same name as a field in the
supertype, overrides the field in the first supertype upwards. So if you have the hierarchy Employee - Manager - BoardMember and all define a field 'Id',
BoardMember.Id overrides Manager.Id, and Manager.Id overrides Employee.Id. This is also the case in the generated code. Be sure the casing is the same, otherwise
the fields will be considered differently by LLBLGen Pro, as they also will be different for C#, however not for VB.NET
|
| Note: |
| You can press F4 when the focus is on the grid area of Mapped entity fields to move the focus to the Field properties and F3 to move the focus from the Field properties to the grid of Mapped entity fields. |
When you're editing an entity which is mapped onto a view or if the entity being edited is mapped onto a table without a primary key, you'll be able
to select which fields are part of the primary key by selecting a checkbox ('Is part of primary key') on the field properties tab. In the case of
the Order entity, this checkbox isn't enabled as the table the Order entity is mapped on has already a primary key defined. The checkbox isn't enabled
either if the currently selected field is part of a relation.
When you've selected a field which is not read-only by default (an identity field, a field of a database type which doesn't require a value (like SqlServer's
Timestamp) or a computed column), you're able to make the field read-only by checking the Is readonly checkbox.
When the entity is mapped onto a view, and the field currently selected isn't part of the Primary Key nor is it marked ReadOnly, you can set the
Is nullable checkbox to set the fields nullability.
When a field is Nullable and the .NET type of the field is ValueType, you can check the
(.NET 2.0) Generate as Nullable type checkbox to make it
get generated as a nullable type (e.g. Nullable<Int> / Nullable(Of Integer)), if you're using .NET 2.0. The initial value of this checkbox is controlled
by the project property
GenerateNullableFieldsAsNullableTypes.
At the bottom of the tab, you see a combobox with known type converters which work on the .NET type of the selected field. In the screenshot above, no
known type converters are available for the .NET type of the field: System.String. If there are type converters available, you can click the
Set button to
assign the type converter to the field. As soon as a field has a type converter set, its .NET type changes to the .NET type of the type converter, and its last column
in the fields grid is set to the type converter's name. To reset the field to it's actual .NET type, you click the
Reset to default button at the bottom, while
having the field selected.
To unmap a field, for example if you don't want a particular field or set of fields in a given entity, you can select one or more fields and click the
Remove selected field(s) button. LLBLGen Pro
will then remove the field or fields from the Mapped entity fields list, and also remove any relations with other entities which are based on that field. The target field
is then added to the list of Unmapped entity fields, of which you'll see an example below.
If you've selected fields which aren't removable (because they're FK fields and the relations can't be removed because a Typed List is based on it), these are ignored.
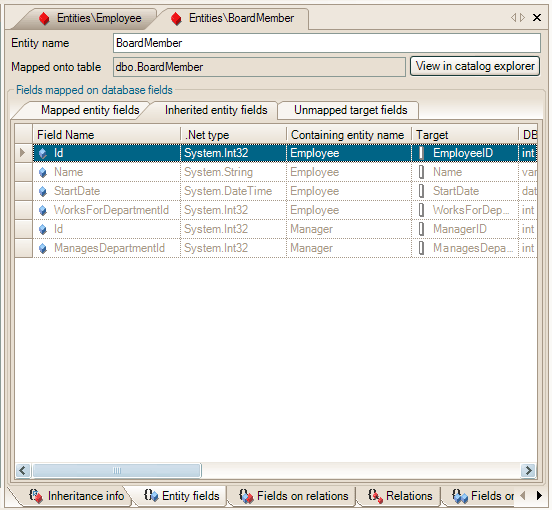
Fields mapped on database fields sub tab of the entity editor: Inherited entity fields
The above screenshot shows the inherited fields of the entity BoardMember, which is a subtype of Manager, which is a subtype of Employee. As you can see, the
fields inherited from both Employee and Manager are listed. If the entity isn't in a hierarchy, this tab isn't visible.
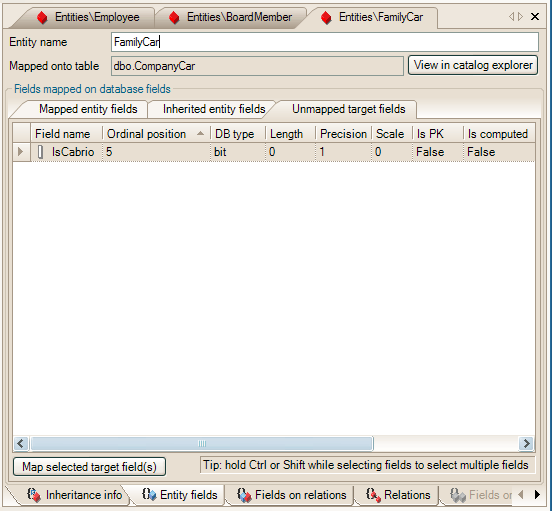
Fields mapped on database fields sub tab of the entity editor: Ummapped entity fields
The above screenshot is from the Subtype entity FamilyCar, which is a subtype of CompanyCar. FamilyCar has one field of its target entity fields unmapped, IsCabrio, as
a familycar typically isn't a cabrio. To map this field in FamilyCar, you select it and click
Map selected target field(s). LLBLGen Pro will then map new fields
onto the selected target fields and any relations which can be created after that are created as well.
The entity editor furthermore contains an area to specify custom properties for the selected field. Custom properties are initially derived from
Extended Properties (SqlServer) or description fields (Oracle, other databases) of the mapped table field. You can add new ones, delete the
initially created custom properties or edit the custom properties. Custom properties are name-value pairs (both strings) which are generated
into the code in a static hashtable. See for more information about using the custom properties
available in the generated code:
LLBLGen Pro generated code - Custom properties.
Fields mapped on relations sub tab
The third sub tab (or if the entity isn't in an inheritance hierarchy, the second tab) is Fields mapped on relations.
An entity can have two possible tabs: Fields on relations and Inherited fields on relations. If the entity isn't in an inheritance hierarchy, the tab 'Inherited
fields on relations' isn't visible. Per tab a screenshot is given and the controls are explained.
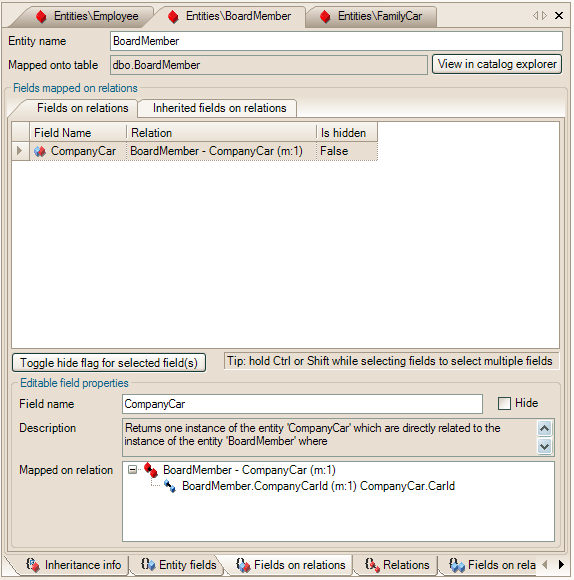
Fields mapped on relations tab
This is the sub tab where
you can edit the fields mapped on the relations of the entity. You can alter the name
and/or toggle the hide flag of the field(s) selected. Hiding fields mapped on relations is sometimes necessary as LLBLGen Pro creates all relations for you it can
construct from existing foreign key constraints. Among these relations are a lot of M:N relations you probably never use. All these relations have a field mapped
onto them. It can clean up your generated code to hide the fields on these relations, if you want to use the relation but hide the field mapped on the relation.
You can also hide the relation completely (on both sides of the relation, or on one side), you can do this on the Relations sub tab (see below).
Hiding a relation also hides the field mapped on the relation. A hidden field mapped on a relation is visualized with a greyed out version of the regular icon:

LLBLGen Pro also tries to construct a description of what kind of data the field will return.
This can be handy to correctly name the field: is it a field which returns a collection of entities ('Orders' in the entity 'Customer')
or a field which returns a single entity ('Customer' in the entity 'Order'). For convenience, the complete relation is visualized so you can easily determine
what the relation represents and what thus the field mapped on the relation will represent for the current entity ('Orders' or 'Customer' or
'Employee' for example).
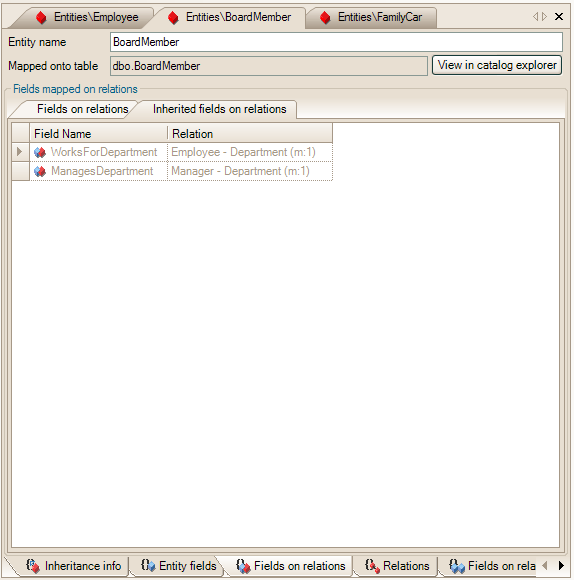
Inherited fields mapped on relations tab
This tab is for information purposes, as no actions can be taken on the provided information. If you want to rename an inherited field, you have to open the
editor of the entity in which the particular field is defined to rename it. In the relations in the above screenshot, Employee contains the field WorksForDepartment
and the relation Employee - Department and Manager contains the relation Manager - Department with the mapped field ManagesDepartment.
 Important: Important:
|
|
Fields mapped onto relations aren't overriding fields with the same name inherited from the supertype. It's therefore
not recommended to give a field mapped onto a relation the same name as an inherited field mapped onto a relation.
|
Relations sub tab
The forth sub tab (or if the entity isn't in an inheritance hierarchy, the third tab) contains a detailed listing of all the relations located in
the entity and all inherited relations (if applicable). Inherited relations are displayed in grey with a suffix like '{
containing entity name}'.
You can click them open to fully visualize the relation.
When you select one or more relations (just the top relations are selectable, not the relations inside an m:n relation neither the inherited relations),
the 'Actions on selected relations' button is enabled and you can then select an action to execute on the selected relations. An example of this is shown in the
screenshot of this tab

Relations sub tab of the entity editor
Toggling the hide flag means that you hide/unhide the relation. When you hide a relation, its field mapped onto it is also hidden. Hidden objects
will not show up in the generated code, like they're not there. You can hide a relation on both sides (thus it is also hidden in the related entity)
or just on the side of the current entity. Hiding an 1:n or m:1 relation can also mean that you hide one or more m:n relations which are build on the
hidden 1:n/m:1 relation: an m:n relation can't contain a hidden sub relation. A hidden relation is visualized with the greyed out version of the
regular icon:

(regular relation) or

(custom relation)
|
Important:
|
|
With SelfServicing you have to hide relations on both sides, because SelfServicing code uses logic in the related entity
to retrieve the objects.For example Customer.Orders asks the OrderCollection to retrieve orders based on the passed in Customer. When you hide the relation
Order - Customer but not Customer - Order, your code will not compile.
|
To toggle the hide flag for multiple relations at once, you can hold cntrl or shift while selecting relations and either select the toggle hide flag action from
the action button or by right-clicking the relations and selecting the action to perform from the context menu.
Removing an existing relation can only be executed on custom relations, i.e. relations you create yourself in the LLBLGen Pro designer. Custom relations have a
blue dot in their icon. The designer will first determine if
it is possible to remove the selected relations, and will filter out relations present in Typed Lists. It will enlist the relations it will remove, including
the m:n relations containing one of the selected relations. If you agree with the enlisted set, LLBLGen Pro will remove the relations and update the project in
the LLBLGen Pro designer.
From the Relations sub tab you can create new custom relations using either the 'Add new custom 1:1/1:n/m:1 relation' or 'Add new custom m:n relation' buttons.
These buttons open relation designer screens which are discussed in detail in
LLBLGen Pro designer, Adding
custom relations.
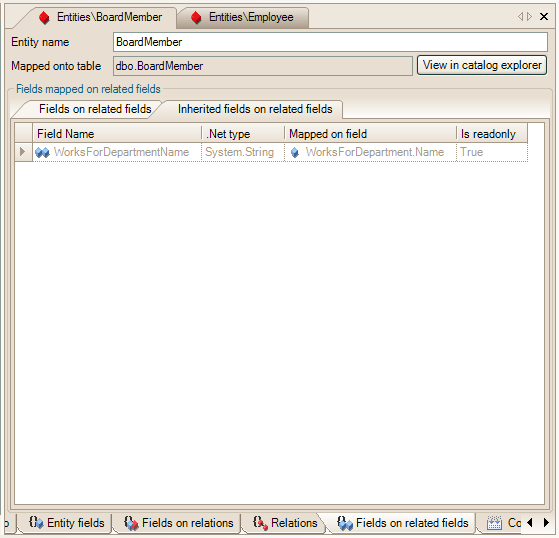
Fields mapped on related fields sub tab
The fifth sub tab (or if the entity isn't in an inheritance hierarchy, the forth tab) contains the fields mapped on related fields editor for the entity.
This tab is not always enabled: it is only enabled if the entity
has one or more 1:1 or m:1 relations, defined in the entity or inherited from the entity's supertype.
A field mapped onto a related field is a field which represents a field in a related entity. The fields mapped onto related fields are shown in two possible tabs:
'Fields on related fields' and 'Inherited fields on related fields'. If an entity isn't in an inheritance hierarchy, the tab 'Inherited fields on related fields'
isn't visible. Per tab, a screenshot is given and the controls are explained.
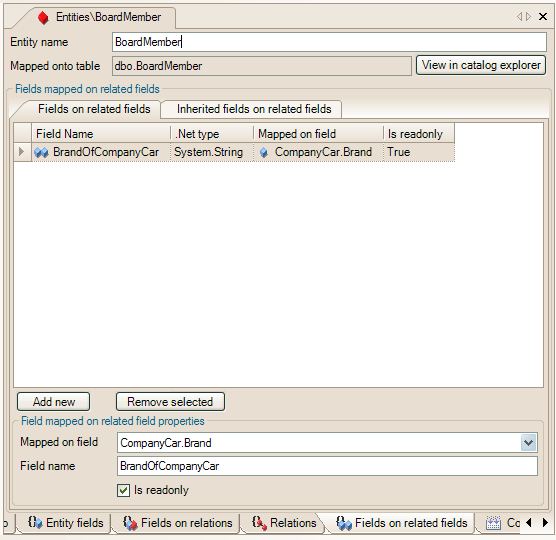
Fields mapped on related fields tab
For example in the BoardMember entity we can add a field called 'BrandOfCompanyCar' which represents the CompanyCar.Brand field, of the related
CompanyCar entity of that particular BoardMember. You can specify if the field is read-only or not. The default value for this setting is determined from the
user preference FieldsOnRelatedFieldAreReadOnly. You can define fields mapped on related fields from entities
related by relations in the current entity but also via relations inherited from the supertype. Though it's generally more useful to map a field in the entity which also
contains the relation, like the field WorksForDepartmentName, which is defined in Employee, and which is mapped onto the related field Department.Name.
The name that's initially chosen for the field is created using the pattern that's specified as
FieldMappedOnRelatedFieldPattern, in the
project properties.
In the following screenshot of the 'Inherited fields on related fields' tab of BoardMember, you'll see this field present, as inherited field.
Inherited fields mapped on related fields tab
Fields mapped on related fields are generated into the code in such a way that they return the default value for their type if the related entity isn't
available. There are other ways to add fields mapped on related fields, for example by adding your own code to the generated code in safe user code
regions. Please see
Adding your own code to the generated classes for details.
|
Note:
|
|
if you're using SelfServicing and you're binding a collection of entities to a grid and you've added one or more
fields mapped on related fields, it will trigger lazy loading for each individual entity in your collection. It is therefore recommended to use
prefetch paths in this particular scenario, to prefetch the related entities using a more efficient query scenario. For more information about
prefetch paths in selfservicing, please see Selfservicing - Prefetch Paths.
|
|
Important:
|
|
Fields mapped onto related fields aren't overriding fields with the same name inherited from the supertype. It's therefore
not recommended to give a field mapped onto a related field the same name as an inherited field mapped onto a related field.
|
Code generation options sub tab
The fifth sub tab contains two different areas: the custom property editor for the entity and a section for output specific settings.
Custom properties
As with other custom properties (except the project and typed list custom properties),
these are initially derived from the mapped table's Extended properties (SqlServer) or description fields (Oracle, other databases).
You can add new ones, delete the initially created custom properties or edit the custom properties. Custom
properties are name-value pairs (both strings) which are generated into the code in a static hashtable. See for more information about
using the custom properties available in the generated code:
LLBLGen Pro generated code - Custom properties.
A screenshot of the entity's custom properties sub tab is shown below

Custom properties sub tab of the entity editor
Output specific settings
The Output specific settings offer the user to specify additional interfaces and namespaces which have to be generated into the code for that particular
entity. You can use macro's in the interface and namespace names:
- {$RootNamespace}. This macro resolves to the root namespace specified when the code is generated.
- {$ElementName}. This macro resolves to the element name, for example the entity name. This name is without suffixes like 'Entity'.
These macro's are evaluated at generation time. To be able to specify the same interface / namespace on a lot of entities at once, you can run the plug-in
Add / Remove Additional Interface / Namespace plug-in which is shipped with LLBLGen Pro. As the name suggests, you can also remove set interfaces / namespaces
from selected entities.
A screenshot of the entity's output specific settings sub tab is shown below
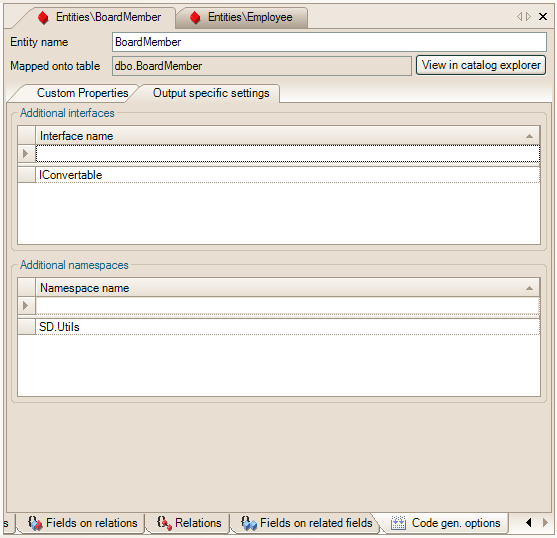
Output specific settings sub tab of the entity editor
All changes you'll make in the editor will be reflected in the project immediately. Also, everything is kept in sync, so when you change an entity's
name, the name is changed everywhere in the LLBLGen Pro designer directly. As you will notice, when you change something, the project's icon in the project
explorer will change to the yellow/red dot, indicating there have been changes. In addition, in the status bar the remark that the project has unsaved changes
will appear.
Viewing entity information
The entities currently in your project are shown in the project explorer, under the
Entities node. This is of course great for a first glance, but
if you want a detailed overview of every entity's detailed information, you need something else. You can of course use the entity editor, but for each entity, it gets
a bit cumbersome. To show a full list of the entities in your project, which targets they're mapped on, if they're abstract or not, if they're in a hierarchy or not,
if they've a discriminator value set etc., you right-click the
Entities node in the project explorer and select
View Entity List, or press Cntrl-Shift-L.
You can also open the entity list overview by selecting
View Entity List from the Project menu in the main designer menu.
To sort on a column, simply click the column header. To sort on multiple columns, as with all the grids in LLBLGen Pro, hold Shift while clicking on multiple columns
to sort on more than one column.
 All entities you've checked in the entity selection screen will be added to the project and will be visualized in the Project Explorer.
If you click open the 'Entities' node, you'll see these new entities added, their fields mapped on table fields, relations the entity
has with other entities, and fields mapped on these relations. As each entity is new, you'll see that all the entities have the front and back color
you've set for changed items in the user preferences.
All entities you've checked in the entity selection screen will be added to the project and will be visualized in the Project Explorer.
If you click open the 'Entities' node, you'll see these new entities added, their fields mapped on table fields, relations the entity
has with other entities, and fields mapped on these relations. As each entity is new, you'll see that all the entities have the front and back color
you've set for changed items in the user preferences.